Wednesday, January 28, 2015

How We Run Our Pinewood Derby

Sunshine's car is the pink blur in the far left lane

There's constant turnover in the pack leadership in most LDS wards, so you never know who will be experienced and who will be a complete novice. Apparently my time as a complete novice is over, since I was the pack committee chair with the most experience this year when we were organizing our 4 pack Pinewood Derby.

There's a huge learning curve that comes with Scouts and I wasn't given much information when I started, so I've had to learn on the job, so to speak. In an effort to make things easier for the next committee chair, and to hopefully keep things running smoothly, I've been writing things down. Though honestly, some of it is for me too. Like last summer I forgot to write down the t-shirt sizes for our adult volunteers for summer camp, so I made a note to remind myself to make a list before submitting the volunteer list this summer. Other notes have involved scheduling certain activities in certain months, recording info, tracking other activities, and so on.

And there's notes on the Pinewood Derby. Keeping track of how things are done and where resources are keeps us from reinventing the wheel every year. So here's how we've been doing our Pinewood Derby the last few years.

We have a newer 4-lane track but no timing mechanism. If we can get all the packs to chip in, we might get the mechanism for next year. In the meantime, we make do without.

We have 3-4 watchers at the finish to visually call the placing, and one person uses an iPad positioned over the finish line to record finishes for playback, when the finish is too close to call.

We use this program to track who races when and who is winning. If you go to the link, you can download an Excel spreadsheet for 2, 3, 4, or 6 lane tracks. The spreadsheets include a page with instructions for use, and it's fairly easy to work with.

The only two things that are sticky for us: the car numbers and recording the places for each heat.

When the boys weigh their cars, they're assigned a number in their age group (the first boy who's a Wolf would be labeled Wo1) which is written on a small sticker and stuck on the car. Once everyone's signed in, I enter the names in the spreadsheet, grouping them by age groups. Doing so assigns new numbers, which are used when keeping track of which car races when. Having two numbers for each car causes unnecessary confusion, especially since the original number is on the car and the computer number is on a separate list.

the cars are grouped by age group, with stickers identifying each one
only adult leaders move the cars back and forth, which eliminates a lot of confusion and problems

Next year we'll probably have the boys register the night before so we have time to enter the info in the computer, assign numbers, and make sure the cars are properly labeled.

Recording the places isn't too much of a hassle, but it does take some concentration to make sure the places are entered accurately after the results of each heat is relayed from the finish to the start.

Of course, if we get the timing mechanism, that would take care of at least on of these issues. The timing mechanism automatically transfers the places to the computer. I'm guessing this means it comes with the software, so depending on how it's set up, it may also eliminate the issue of conflicting numbers on each car.

How do you run your Pinewood Derby? What works? What doesn't?

Tuesday, January 27, 2015

DIY Pinewood Derby Trophies and Awards


I mentioned yesterday that we had our Pinewood Derby on Saturday, and I wanted to shared the trophies I made. We combined our pack with the packs from three other LDS wards in the area, so we had a nice size group that divided the responsibilities. Totally the way to go, since no one had to do it all. Our pack handled the awards and the computer program that managed the heats (more on that tomorrow).

Our pack did the awards last year also, but someone else made them and her son bridged over last year, so I said I'd do them this year. Just the type of creative outlet I like.

I did some googling and checked out pinterest back in November or December when I first said I'd do them. Then I didn't do anything more until a couple weeks ago when I sorted through our massive scrap pile in the shed to find wood for the trophies.

I thought I'd seen some like these when I looked the first time, but when I went back to look at them again, I couldn't find the exact style. In any case, it's not an original idea and there's lots of similar ideas out there.

the pieces and materials used

I cut 2x4s in three heights for the posts, angling the tops. The 8" high posts were cut from 3" on one side to 5" on the other side. The 10" high posts were cut from 4" to 6". The 12" high posts were cut from 5"to 7". Setting the mitre saw at 31.5* gave just the right cuts for those measurements.

I cut 1x4s for the bases, making each one 5" long.

I lightly sanded the edges to knock down the rough bits, then glued matchbox cars on with gorilla glue. I used painters tape to keep the cars in place while I waited for the glue to expand and dry. I had to keep changing the positions of the posts to keep the glue from dripping. I still missed a few and had to carefully scrape them up.

Once the glue dried, I drilled pilot holes and screwed the bases to the stands. I made 1st-3rd trophies with cars on top for each age group (Wolf, Bear, Webelos, and Sibling), and a fastest of the fastest trophy with a platform for the winning pinewood derby car to sit on. That's thirteen trophies total.

unpainted fastest of the fastest trophy with other unpainted trophies in the background

The fastest trophy was a little taller than the first place trophies and I changed the angle to about 22* (the marking that's closest to that on our saw- can't remember right off). The top is about 7 or 8" long with screen trim for the lip. I should have used a taller piece of wood for the lip since it didn't come up high enough to keep the nose of the car in place. When I tried Sunshine's car on it, it rolled forward to the wheels. But I didn't try her car till after I'd painted it already. Oops. Live and learn.

I forgot to take a good picture before I started painting, so the picture above is the best I've got. Below is a shot after I primed the trophies and just before I sprayed them with silver metallic paint (these were the second place trophies). I used gold metallic spray paint for the first place and fastest trophies and hammered copper spray paint for the third place trophies. The hammered copper didn't leave quite the finish I wanted, but it was half the cost of the bronze metallic spray paint, so I didn't worry about it too much.


After the paint dried, I used my Silhouette to cut white vinyl for the age group labels and places.

Like most things I do, they're not perfect (I should have sanded them a lot more), but I'm pleased with how they turned out and everyone thought they looked nice, so I'm not going to obsess over their imperfections :)

I ordered a PDF file from this etsy shop and printed out certificates for each of the boys (there's other items you can print as well). I didn't like the generic ones I found online, and most of the nicer ones had categories already printed on them (most sporty, best whatever), and that was not what I was looking for. I don't agree with making up awards just so everyone can get one (don't get me started on those stupid soccer trophies Sunsine gets at the end of every season), and I wanted to just give participation certificates.

These certificates have a unique look to them that got us several compliments. And there are options included in the file if you do want to give the boys "category awards". We printed out 50 so we would have enough for siblings who participated and mess-ups while writing.

you can personalize the title above as well as the pack info and date
I added the watermark because I'd feel really bad if someone managed to steal the image I shared- it's only $9, so go buy a copy and check out the coordinating items she has available

I had planned on just doing the certificates for each of the boys, but at our den meetings on Thursday our boys were excitedly talking about the candy cars they got last year. When I mentioned we weren't doing them this year, they were very disappointed.  So I rethought that decision and Friday I put together 60 candy cars so the boys and their siblings could each have one. They were very happy :)

I found several designs online and ended up combining ideas from several to get these. I actually forgot to take pictures before the race, and these are all that made it home with us. I used several varieties of snack size candy bars for the bodies of the cars with Hershey miniatures glued on as spoilers (the wrappers on the cars below are a little battered from being pushed around in the container). I used low-temp hot glue that allowed everything to stay stuck and only slightly melted the chocolate.


I used Lifesavers and round candies for the wheels. The round candies were walmart brand, which have allergy contamination notices on the packages, so I made several cars with Lifesavers (and no Krackle bars) to make sure they were gluten free. I used dabs of glue to stick the ends of the candy wrappers to one side before adding more glue and sticking them to the sides of the candy bars. Probably overkill, but I liked how it looked.

I tried to buy enough of each candy that I wouldn't have a lot of any one kind left over. I had planned on making 50, but had enough for 60 with just a couple random candies left over.

I will admit that these awards aren't the quickest to make, but they are pretty cost-effective if you're on a budget.

  • I had the wood, glue, screws, and primer, and purchased the cars ($12 for 12 cars) and spray paint (about $12 for 3 cans, with some left over). That's less than $2/trophy for 13 trophies.
  • The certificate file was $9 (one of the moms printed the certificates for me since we only have a black and white printer, an additional cost would be $3-4 for card stock). That's about $0.26/certificate for 50 certificates, and the file can be used for future pinewood derbies.
  • I had the hot glue already, and had to purchase the candy (4 bags of round candies, 1 bag of Lifesavers, 4 bags of snack size candy bars, and 1 bag of Hershey's miniatures came to around $25). That's about $0.42/car for 60 cars.
The trophies and candy cars could also be adapted to be used for a car or racing themed birthday party.

Monday, January 26, 2015

7 Miles on the Treadmill

{crappy cell phone pic} Sunshine has converted River to her love of boxes; here he's reading one of his favorite books that he likes to carry around

Running on Monday after a long run on Saturday is a bit hard, but it really works so much better with my Tues-Thurs schedule. Having two days of walking before my long run seems to be helpful even though it means I have a shorter recovery post-long run.

That said, I did skip my run on Monday because I was tired and my feet were still sore from my 6 mile run. And my left glute was a bit sore from Saturday also. I had problems with it while pregnant with River, so I'm trying to avoid making it worse.
Tuesday-I walked.
Wednesday- I was supposed to run, but my legs still felt a bit off, so I walked. My left calf also felt a bit off that day for some reason.
Thursday- I wanted to run (it was a less crazy Thursday than usual, so I thought I could fit it in), but my calf was still feeling off. I wore my new compression socks (more details next week) while walking and they seemed to help a bit.
Friday- I walked.
Saturday- We had the pinewood derby in the morning, so I ran after we got back. It rained off and on all morning and was still looking rainy when we got home. I ended up taking a nap before going for my run. By the time I woke up and was functioning again, it had cleared up and was even sunny. But I wasn't prepared to run outside at that point- clothing, cold weather gear, water, etc- and had already mentally prepared myself to run on the treadmill, so I stuck with that. It was getting dark by the time I finished since I started later in the afternoon, so it was just as well I stayed home. I'm a bit paranoid about running at dusk and in the dark.

While running, I thought about how I felt during long run this week and last. The beginning is always rough, but then things loosen up and I settle into my groove. I came to the conclusion that I just need to run, even on the days I'm feeling tired and off. If I do, I'll feel better once I get going.

Saturday I warmed up by walking for 10 min, then I ran 30 min, walked 5 min, ran 30 min, walked 5 min, ran 30 min, walked 5 min, and ran for 6:25 min. I then walked for another 13:35 min for my cool down.  All told, I was on the treadmill for a total of 135 min and 8.17 miles.

Discounting my warmup and cool down, I completed 7 miles in 111:25 min by running 96:25 min and walking for 15 min. My average pace was 15:55 min/mile. Last week I completed 6 miles in 93 min at an average pace of 15:30 min/mile. So I was a bit slower this week than last week, but I also wasn't pushing it as hard as I did last week. My recovery from last week was a little slow and I think that impacted my run this week. But honestly, I'm just happy that I'm able to run and that my distances are increasing.

My total mileage for the week was 16.10 miles, an improvement on last week's 13.97 miles.

Saturday night I realized it's time to start wearing my maternity support belt again. My hips and knees were very painful and uncomfortable after all that time on the treadmill. Thankfully I have a very nice husband who was willing to give me a good massage that went a long way to relieving the pain. We pulled out my bin of maternity clothes that night so I could start wearing my belt while running. This is about two weeks sooner than I needed to wear the belt when I was pregnant with River, but my mileage is a lot higher this time, so I'm not surprised. On the other hand, my feet aren't sore like they were last week, so bonus for me.

Thursday, January 22, 2015

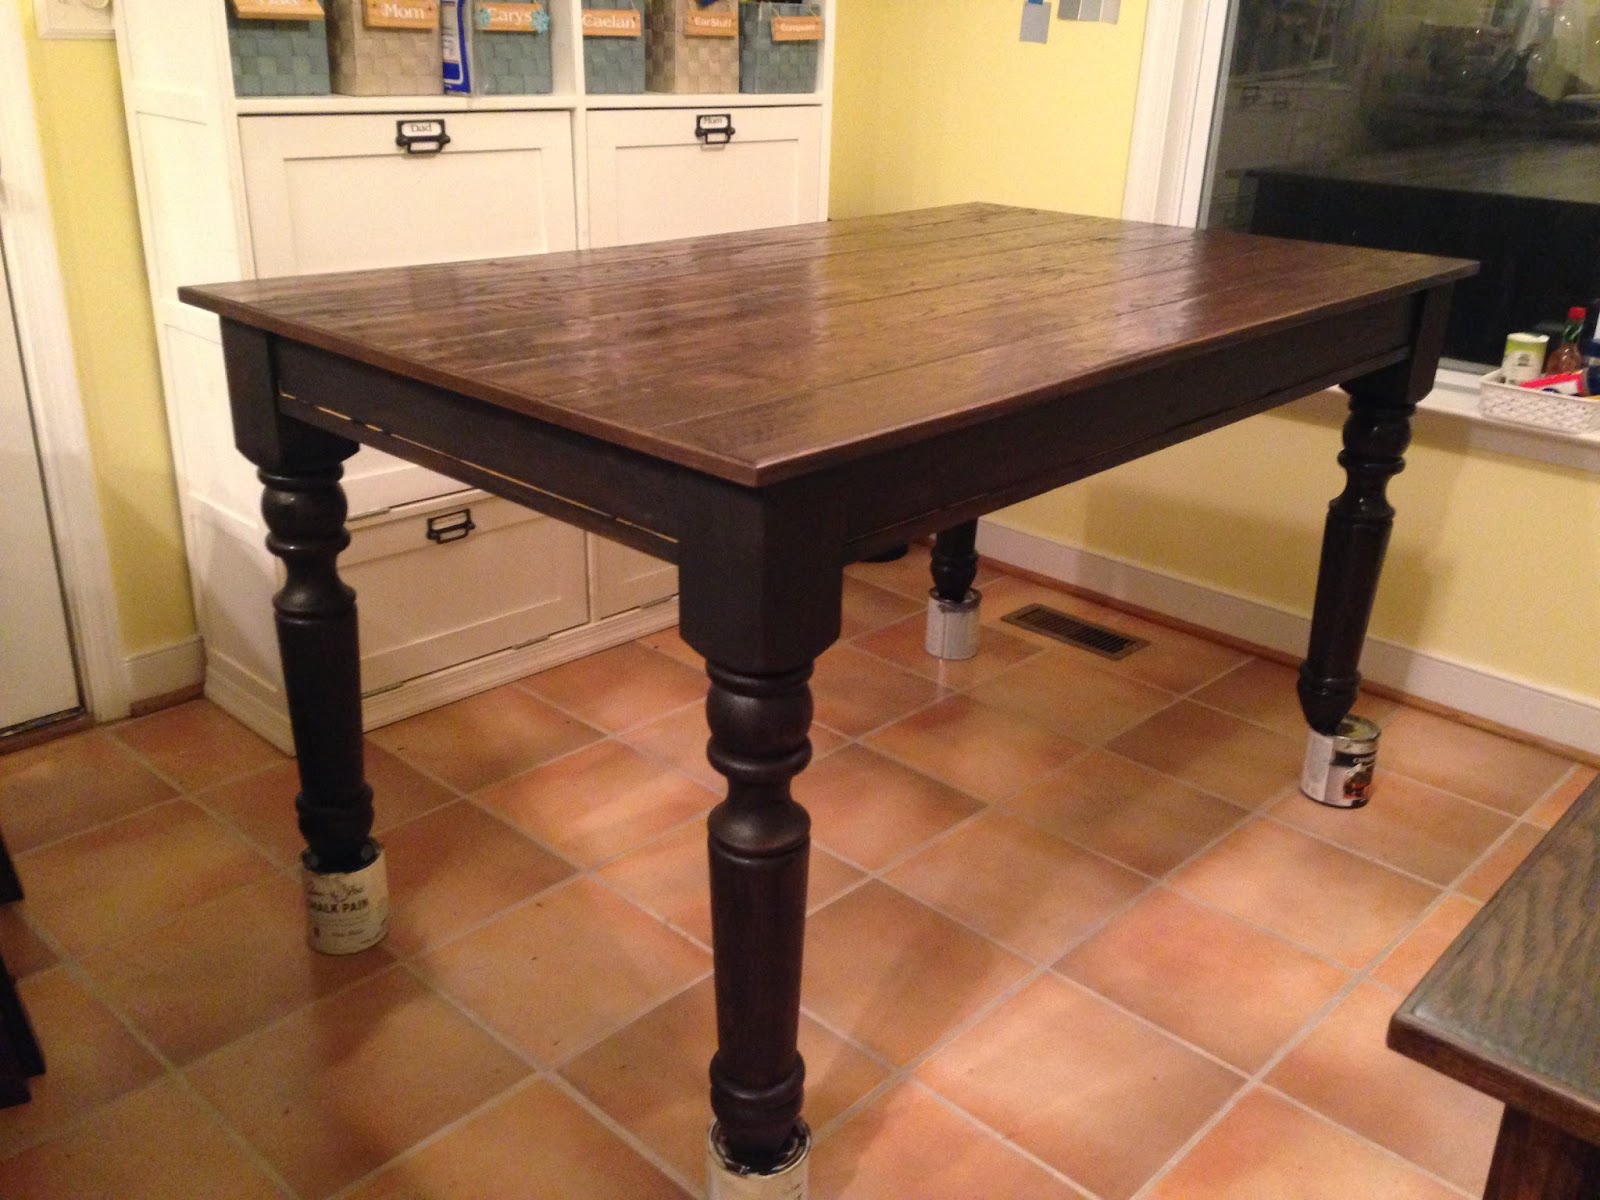
I Finally Painted the Dining Table


Remember how I was on a building blitz back before River was born? I built several pieces of furniture, but didn't paint or stain them. I'm finally getting that done.

While I was working on the sofa table, I tackled the dining table and benches also. Might as well get all the smelly staining done and out of the way as quickly as possible, since I had to do it indoors, wearing my painting respirator.

The table top is tongue-and-groove flooring with a hand-scraped hickory finish and it has held up much better than the original pine-topped dining table that I built a few years earlier. I trimmed out the table top with oak screen trim, but never got around to staining it. The bare wood next to the hickory top has been a glaring contrast ever since.

I stained the sofa table first so I could experiment a bit with stain colors. After the sofa table, I knew the ebony and mahogany stains I had wouldn't match the table top, but the kona I had bought would match. In fact, it matched very well and the table top looks completely different now.
in the process of staining the legs, table edges already done

While I was at it, I stained the apron and legs to give a nice base color under the paint that went on top. I mixed up some paint using Annie Sloan chalk paint in Country Gray (which is actually a light tan) as the base, with some black and brown paint mixed in. It dried to a nice grayish brown that goes well with the stained top.
table stained and ready for paint

one coat of paint on longer bench, shorter bench waiting for paint

After two coats of paint, I used dark wax on the apron and legs and light wax on the oak trim on the table top and bench tops. Even though the short bench has been down in the guest room in the basement, I stained and painted it to match just in case we need to bring it up for extra seating.
kinda crappy picture

I managed a couple photos with slightly better lighting that show the colors better. I really like how it all turned out. It looks like real furniture now :)


With the dining table and bench taken care of, the dining area of the kitchen is just about done now. I painted the shoe bin and fixed the art frame in the summer. Next up is hanging some blinds in the window. We're hoping to replace the cabinets, counters, sink, and flooring this spring, and when we do we'll repaint the whole kitchen area also. I like the yellow paint, but it makes the white trim and cabinets look dingy.

Wednesday, January 21, 2015

I Finally Painted the Sofa Table


Remember how I was on a building blitz back before River was born? I built several pieces of furniture, but didn't paint or stain them. Now I'm finishing those projects.

I started with the sofa table that hides behind our couch. The lack of paint and stain wasn't super noticeable, but it's been bugging me. I've hit my second trimester energy surge (or more accurately, my I've-gotta-get-stuff-done-now-while-I-can phase) and decided to get busy.

I've been thinking about what I wanted to do with this table for awhile and in the end I decided to stain the top and paint the legs. I actually stained the whole thing first so that the stain would show under the paint if I decided to distress it.

I ended up layering stains as I tried to find a color I liked. I started with ebony, but it was too light, so I added some mahogany, but it was too red. At that point I went to Lowes and bought some kona, which is a nice dark brown. If I'd started with the kona, I wouldn't have needed to layer the stains, but I was trying to use what I had.

I also cut a piece of wood to fit the open space in the middle shelf of the table. I was storing the extra couch cushion there, but since we moved furniture around in the living room and put the chaise part of the couch in the basement, the table just looks a little odd with the open space. Since the table is positioned between a wall and the couch, it's not too visible, but someday it might be. I decided it was easier to fix it now, rather than later.

After the stain dried, I painted the lower portion of the table with Annie Sloan chalk paint in Aubusson blue, which is just such a gorgeous color. I did consider distressing the legs, but decided to just lightly sand all over to smooth out the paint. In the future I can distress more if I decide it needs it. After the light sanding, I waxed the lower part of the table with dark furniture wax, which slightly darkened the paint. I used clear wax on the top since I'm running low on dark wax (and have to order it online) and it wouldn't make a visible difference anyway because of how dark the stain is.
pre-waxing, love the color combo!

the blue looks a little brighter here than it does in real life, but overall it looks so much nicer than before

Just to remind you, here's what it looked like before:

I still haven't figured out how to take decent pictures in this corner of the living room, so this is the best I managed.

I managed a better picture on the other end, with the window behind me instead of in front of me. This is the picture that's closest to the true color. Isn't it pretty?

And back to the other end, now with the lamps and blankets and such.

This was a pretty easy project that didn't cost very much- I had everything on hand except the kona stain and the shelf piece (I think I cut a piece for it when I built it, then forgot that was what it was for and used it in another project- oops!). It looks so much nicer now and I love how it turned out!

And an idea of how it ties into the rest of the room, again with crappy lighting.

Tuesday, January 20, 2015

Cookbook Shelf

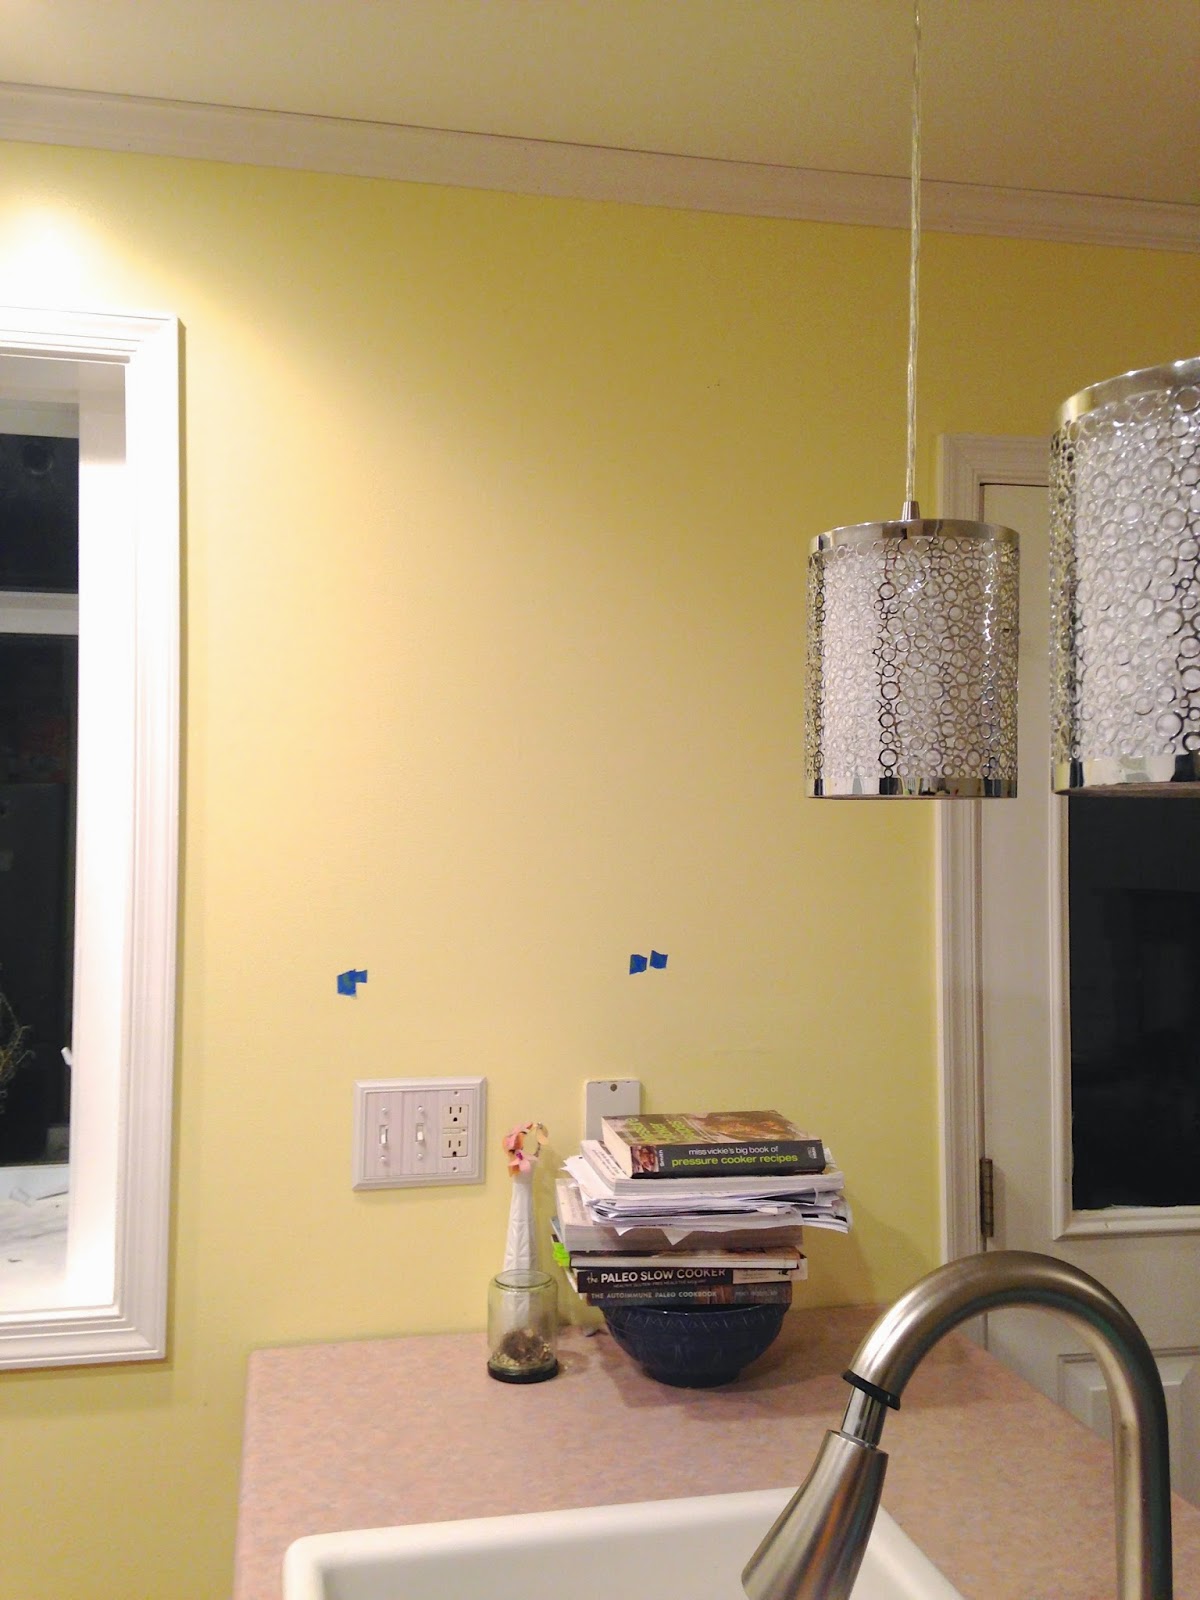
Ever since I pulled down the hanging cupboards in the kitchen I've been trying to decide what to do with this wall.
the blue tape is marking the studs

The counter space tends to collect stuff and the wall is wasted space. I've thought about putting up some floating shelves when we re-do the kitchen, hopefully before the baby comes this summer, but we'll have to see how things go financially. In the meantime, I'm tired of the stack of cookbooks and the clutter it attracts, so I decided to do a temporary fix.

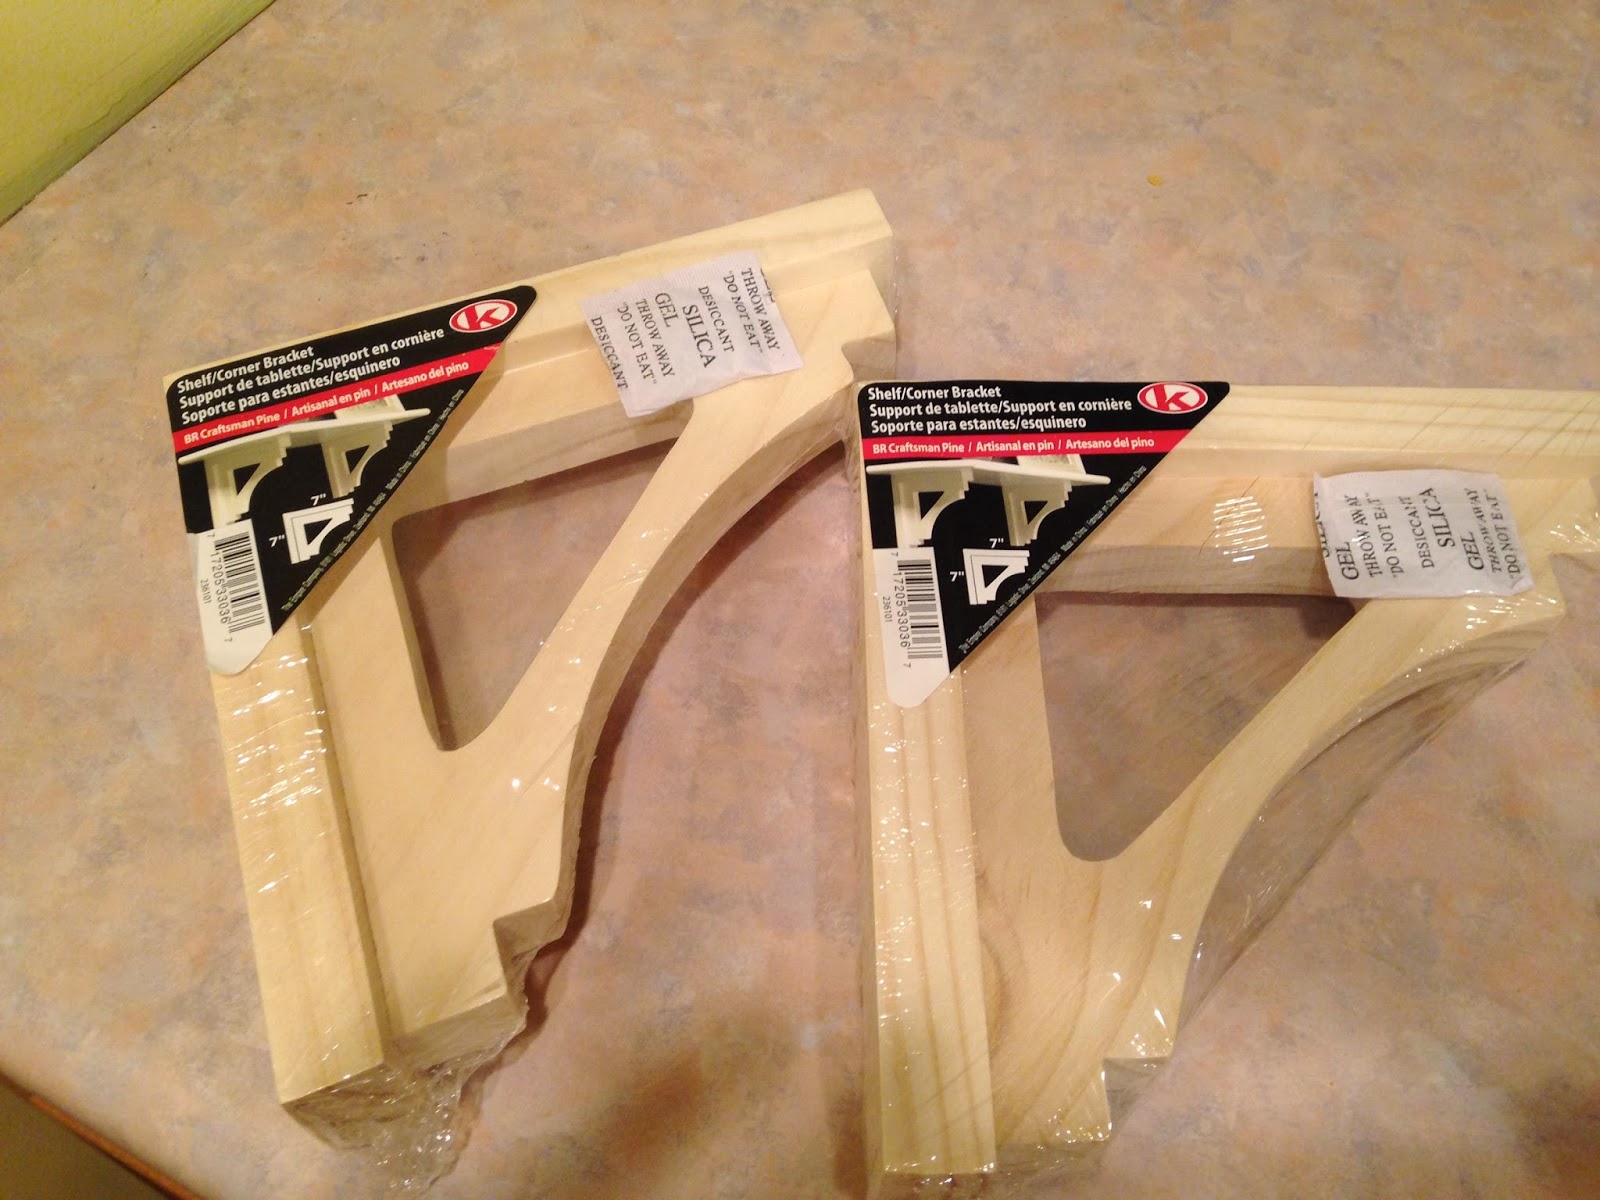
I didn't want to hassle with building floating shelves until I know if we like shelves on this wall, so I decided to do a simple shelf supported by brackets. I originally bought these scrolly brackets, but had to return them.

Turns out they're only decorative and you attach them to an upper corner of a doorway with one nail. Not what I was looking for.

Then I found these smaller brackets that actually are meant to be weight-bearing.

Metal bracket for resting on a screw. Much better than a single nail hole.

All I had to do was screw two screws into the studs (which is why they're off-center on the wall), making sure they were level, and then hang the brackets on the screws.

I rested the board on top of the brackets and screwed it into the brackets to keep it in place.

The board is a 12" board, so it's a little wide for the brackets, but I didn't want to cut down the board, so I left it as-is. Since it's a temporary fix, this is just one of the things we're testing out. This was also a quick and inexpensive project since I had the board and screws and just needed to buy the brackets.


We have cookbooks in our library, but we like to have the ones we use most often in easy reach. There's also a stack of recipes I've printed from various blogs that I still need to put in a notebook.

I added a vase of flowers Sunshine made me a couple years ago and a jar with a small bird's nest in it. I need to find something nice and heavy (maybe some antique irons- the heavy cast iron ones) to put on either side of the books to keep them in place and prevent them from knocking the other items off the shelf.

Overall, I like the shelf on the wall. A second one above it would be handy for holding decorative items like my white pitcher and that blue bowl. I think the shelf should probably extend across most of the space (centered better), and floating shelves would hide the fact that the studs are off center on the wall. If we didn't need the brackets, we could also lower the shelves a little, and I think 10" wide shelves would be more than sufficient for holding cookbooks and such.

Monday, January 19, 2015

Six Miles on the Treadmill

upside-down half selfie, courtesy of River

Mr M had stuff he had to do all day on Saturday, so I did my long run on the treadmill again.

I walked for 5 minutes, then started running.
The first 10 minutes were rough, but then I settled in and everything felt better. This happens when I run outside too, but it's more noticeable on the treadmill.
Altogether, I ran for 30 min, walked for 5 min, ran for 30 min, walked for 5 min, and ran for 23 min.
I then walked for 17 min to cool down.

I kept it nice and easy, like last week, with the main goal being to just get my mileage in. However, I was feeling pretty good, so I sped up a bit on the second round and a bit more on the third round. By the end I was going at a decent pace that was quite a bit faster than when I'd started, but it felt good. I kept my walking warmup and cool down separate from my run mileage this week for a more accurate idea of speed and pace. Between the warm up and cool down I added another 1.1 miles to my total for the day. 6 miles run + 1.1 miles walked = 7.1 miles total.

It took me 34 min to complete 2 miles.
The clock was at 64:30 min when I hit 4 miles.
And at 93 min I finished my 6 mile run.

The times reflect the fact that I sped up as my run progressed, and left me with an average pace of 15.5 min/mile. Not bad for a long treadmill run. And I only walked 10 minutes during those 93 minutes, so yay for progress! By comparison, it took me 90 minutes to run and walk 5.2 miles last week.

The pace is a little slower than I need to run my half, but at this point I'm not too worried since it was on the treadmill and I wasn't running my race pace.

------------------

This week I registered for my half marathon in April. It's a good thing I actually glanced through the terms and conditions, though. Because of road closure limitations, this race has a 3 hour time limit and walkers aren't allowed (i.e., you can't walk the whole thing). In theory, that's not a problem, since all four of my half marathons have been completed under 3 hours (ok, that first one was 2:59:18, but that is still less than 3 hours!). However, none of those half marathons were run while 25 weeks pregnant. So it's a good thing I'm being as diligent as I am with my training this time around. I'll need to keep a maximum slowest pace of 13:44 in order to finish under 3 hours, but obviously I'd like to finish faster than that.

I also registered for the 8 mile run I'm doing at the end of February, but didn't register yet for my March 5k. The one I ran last year isn't open for registration yet, so I may run a different one on the same day since I'd like to get the registrations done and out of the way.

My mileage for the week: 13.97 miles. It's less than last week, but I also skipped my walks on two days this week because I was tired and didn't have the energy. Better to skip my walks than my runs, though.

Sunday, January 18, 2015

Sunday Funny


For a while River would walk around the house, carrying one book or another. Mr M and I repeatedly tried to sit him on our laps and read the book to him. He would always got upset, take his book away from us, and walk away.


He's finally gotten the idea of what books are for and will now bring us a book, ask (grunt with arms up) to sit on our lap, and will sit through us reading a couple pages of the book. Then he decides he's done and slides off our lap :)

The following pictures were all taken within about a ten minute period yesterday morning. That's four different books in not many more minutes. Such a busy little boy!

I think it's so funny that his pj sleeves are always pushed up to his elbows. They don't start that way, but they always end up that way. It just screams "active little boy" to me :)

here he wanted me to put my hand in the finger puppet glove attached to an Old MacDonald book.
he didn't want me to read it to him, just put my hand in it and wiggle the animals at him.

going for a kitchen drawer. not that drawer, though.