Showing posts with label what we eat. Show all posts

Wednesday, January 23, 2019

How I'm Managing My Narcolepsy

wish I could sleep this well...

I don't have severe narcolepsy, but it is bad enough to interfere with my life on a daily basis. I never sleep well, struggle with insomnia, wake up tired (I always feel worse than I did when I went to bed), and want to fall asleep throughout the day. I've been fighting the urge to sleep during the day for so long that I've just interpreted it as being tired, but after some reflection, I've realized it's sleepiness and my body trying to fall asleep.

Thursday, April 12, 2018

Homemade Butter from Grass-fed Cows

my first pat of butter

A few months ago we started buying our milk from a local grass-fed dairy farm. It’s illegal in our state to sell raw milk, but it’s not illegal to drink raw milk from cows you own. Herdshares allow you to buy into a herd of cows, thereby giving you ownership. We pay a monthly fee towards the feed and board of our cow and receive a gallon of milk each week in return.

Since starting the herdshare I’ve experimented with making raw yogurt and have now experimented with making butter. When we lived in NY when I was in first grade we got milk straight from the tank at the dairy down the road. I remember mom had a butter churn paddle setup in a large jar (something like this, if I remember correctly, though I think mom's was larger). This one and this one look interesting, as well.

I thought about getting a butter churn, then I found this tutorial that uses a food processor. Since we have a food processor, I opted to give this method a try before investing in a butter churn. 

cream at the top, waiting to be made into fresh butter

a quart of cream poured off, with some still in the jug

Using the food processor is super easy and only takes a few minutes. I’ve been pouring off a quart of cream from each gallon and churning it in two batches in the food processor.

after churning, butter floating in the buttermilk  

buttermilk poured off into the jar, butter waiting to be washed

Washing all the buttermilk from the butter is the hardest part, but this last batch I used the food processor to wash the butter. After pouring off the buttermilk, I added cold water to the food processor, whizzed it around a bit, then poured off the water. I added cold water and repeated the process several times until the water was clear after whizzing the butter around. Easier than doing it by hand with a wooden spoon, but still the most time-consuming part of the process.

In any case, it’s easy to make butter when you're not churning it by hand for hours and hours :) And it’s fun to do something we’ve read about in the Little House books, just like maple sugaring and making maple candy, both of which are in mentioned in Little House in the Big Woods and which we’ve done as well.

my most recent pat of butter

Sunday, April 9, 2017

Sunday Funny


When I was sick with my ear infection a few weeks ago, I bought a frozen gluten free mac and cheese for dinner one night. Sunshine was able to cook it herself (she just had to toss it in the oven) while I laid in bed. We very rarely eat mac and cheese, mostly because grains are such a problem for me. So we've had mac and cheese once, maybe twice since Ocean was born.


As you can see, he wanted nothing to do with it. His reaction was so funny (and long lasting) that I grabbed my phone and captured these pics of him having a meltdown. He kept trying to hand my his plate- he didn't want it anywhere near him. Usually if he doesn't want to eat something I can pull it away from him, leave him alone, and he'll start eating once he calms down. That did not work on this occasion.


He was very offended by those noodles, but he did eat his broccoli.

Sunday, January 29, 2017

Sunday Funny


Ocean was feeling peckish in the checkout lane at Costco. Broccoli doesn't taste nearly as good when it's still in the bag though :) He enjoyed it a lot more once it was cooked. He and River both love their broccoli.


Tuesday, June 28, 2016

Chicken Coop Progress, Week 8 and Chicks!

what the coop looked like at the end of week 7

The first work day I purchased the rest of the plywood I needed since I'd miscalculated how much I needed. Then I got the rest of the big pieces hung. I cut out pieces for windows, but other than that it was pretty straightforward.


A miscalculation I made early on is continuing to cause problems and be a pain. The end (narrower) walls are 8' wide, but I should have made them a few inches less than 8' wide so the outside width was 8'. Since I didn't, my outside width is about 8'4" wide, which leaves a gap between my two 4' wide sheets of plywood, as you can see below. In hindsight (as I'm typing this), I should have kept the plywood pieces together and left the gap on one side, rather than in the middle, where it's a lot harder to match up siding with grooves. Lesson learned. And I should have been a bit more careful measuring the angles for the end gable pieces- I didn't get those quite right either.


The second hand door I bought for the coop didn't come with a knob. I planned on buying one eventually, but then I remembered that I had a knob I purchased years ago and never used.


I never used the knob because it came with just the two knobs and the center threaded rod for attaching them to each other. There weren't even the basic base plates that come with dummy knobs. This door didn't need the base plates though, so this knob was perfect.


It was super simple to install and adds a little bling to the door. Because every chicken coop needs a little bling. Oh, and it's much easier to open and close the door with the knobs in place :)


I filled in the missing bits of plywood and called it good for the week.


---------------------------------------------------

As I mentioned last week, I finally ordered our chicks. They were hatched Monday and we picked them up at the post office Wednesday morning. I ordered 30, in the hopes that not too many would die and we would have at least 25 to put in the freezer come harvest day. That would give us one chicken every other week for a year (our current consumption rate) or one chicken every week for half a year. Since I'd like to do another batch of chicks this fall, that would allow us to eat one chicken a week for a full year (our preferred consumption rate).

cute little fuzzball just home from the post office

 I thought this bin would make a great brooder until I put 30 chicks in it and realized it was too small for that many chicks.


So I divided the group between these bins, which are working out a lot better. Though the sides aren't as tall and I'm worried about the chicks hopping/flying out as they get bigger. I'll probably have to make a screen top to cover the bins to keep the chicks in. We're still using the heat lamp, but I unplugged it for the pictures because heat lamps wreak havoc with picture quality.


The feeders and waterers are sitting on a 2x4 framework covered with plastic mesh. This helps keep the feeders and waterers cleaner (fewer shavings tracked/kicked in) and also keeps the bedding cleaner and drier.


We lost three chicks the first two days, but none since then, and are hopeful that we can keep these alive and healthy.

Tuesday, June 21, 2016

RVs and Ice Cream


2007 Itasca Winnebago Navion 23J, image source 

After two long road trips (4 days and 6 days- 1, 2) in the last 6 months, we've decided an RV is closer to being in our future than we had thought. We had planned on waiting a couple more years, but the road trips showed us that we really need the advantages that come from having an RV when we take our next big road trip next summer (we were supposed to do one this past summer, but I was too close to giving birth to Ocean for that to happen). We drove the Camry both times because it gets better mileage, but the CRV wouldn't have offered much more space.

Some of the things we're looking forward to: more space for the kiddos (River is already figuring out how to push Sunshine's buttons), on-the-go bathroom breaks (important with little kiddos), better food options (not relying on junk food or the closest 5 Guys or Chipotle), and not being dependent on static hotel reservations. Sometimes we make good time, but have to stop because we reached our hotel, even though we could still drive some, or it was slow going and we really just need to pull over, but we haven't reached our hotel yet. Being able to pull over into a convenient truck stop, rest stop, or wally world really makes traveling so much nicer. 

We first thought that the Winnebago Era 70X on a Sprinter chassis would be a good option. Diesel engine with power, short enough (only 24 feet long) to be maneuverable in traffic, 5 seat belts in the back, frig, sink, and stove in kitchen area, and -most important- a small bathroom for kiddos to use when the need strikes. They're not the easiest to find, but I found one with the floor plan we liked while we were driving back home on our most recent road trip (seriously, that road trip showed us just how much we need a different road tripping vehicle), so we stopped to look at it at some random RV dealership. I liked it, but Mr M felt it was a bit cramped side to side.  The 70X doesn't have a slide, so there's no extra space, like our little trailer had. 

that back bench has 3 seatbelts and converts to a large bed

doesn't River look like he's inspecting the upholstery?

The dealership also showed us a couple small Winnebago Class Cs, which gave us a good place to start looking at other options. When we got home I did some more research and found several small Winnebagos I thought might work. We found one or two of them at a dealership an hour or so away, so we took a little trip up there to check them out.

The 2016 View J was nice (and has a slide), but only had three seat belts in the back. Since we plan on adopting still (someday I'll do a post on that) we need four seat belts for kiddos. We liked the dedicated bed in the back and the bed over the cab: lots of sleeping space for everyone. If we went with  the Era 70X, the kiddos would be sleeping on the floor and rigged-up beds across the front seats, which would work, but not be optimal.


Since we were there, we checked out some much bigger RVs that were of course roomy and impressive. But we don't want anything too big (mileage decreases the bigger you get, and we already did the low mileage thing with the truck and trailer), so we're concentrating on the smaller models.  The challenge is finding a smaller RV with four seat belts in the back- most only have three.

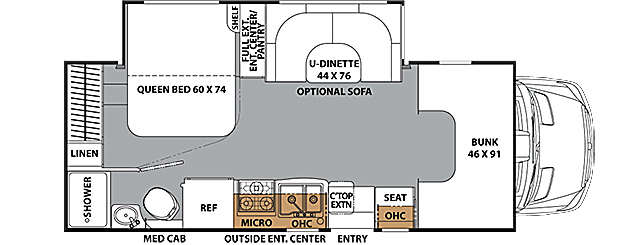
I have found several models that are 23-24' long, have a slide, cab over bed, freezer over frig, and 4 seat belts in the back, but most of them were only produced in certain years. 2007 for this one, 2008 for that one, 2011 for this other one. It makes it a bit more tedious when searching for listings, but at least there's options. If money weren't a factor and we could buy a brand new one, I'd pick this one, the Coachmen Prism 2200 LE:

It has 3 seat belts at the dinette and 1 by the door and a really cool entertainment center/divider between the bed and the dinette.

We're not planning on purchasing one until late next spring/early summer, before road trip season starts, so we have time to look for the right RV for us, which will probably be the 2007 Itasca Navion/Winnebago View 23J (different names for the same vehicle).

---------------------------------------------------

On our way home from looking at RV's we stopped for ice cream. It was cold and rainy, but every time we pass this place we say we should stop there, but we never do. Are we the only ones who do this?


So this time we decided to stop and try out the ice cream. It was pretty good, and River made friends with the local cow:

when he gets older he's not going to appreciate this picture nearly as much as we do :)

Wednesday, June 15, 2016

Gluten Free Dutch Oven Pineapple Upside Down Cake


Last Friday night we had our annual Cub Scout family campout. We had a great turn out and everyone had lots of fun. Each family was responsible for their own meals, which means lots of foil dinners and hot dogs. We went the foil dinner route (and they were quite good, if I do say so myself. I added a couple pieces of bacon so there would be enough fat to keep everything from burning and it gave a great flavor to the meat and veggies), and of course there was s'mores for dessert.

But Friday morning I got to thinking about it and decided I wanted to do a dutch oven pineapple upside down cake. Never mind that I haven't done any dutch oven cooking in years.... Since it was a last minute thing we stopped by wally world on the way to the campground to pick up a boxed cake mix and a can of pineapple rings. I brought eggs, brown sugar, and butter from home to round out the ingredients.

Wally world used to carry Betty Crocker gluten free cake mixes, which I've used a few times with decent results. But this time they didn't have them- they only had Pillsbury gluten free cake mixes, which I've never used before. Without any other options, I decided to give it a try.

I read through multiple upside down cake recipes, and they're all pretty much the same. Butter and brown sugar in the bottom, pineapple rings on top, followed by cake mix that was already mixed up in a bowl, using the pineapple juice from the can.  I also read that lining your dutch oven with foil made clean up a lot easier. Since our dutch oven is in need of re-seasoning, I opted for a couple layers of foil.

Once the cake was layered into the dutch oven, I put the lid on and put it over some coals in the campfire. I pulled out a small chunk of smoldering wood and put it on the lid. Everything I read said using charcoal briquettes is the easiest route as it's easier to be precise. I would have to agree, since the top of my cake was done before the middle was. But after rotating the dutch oven a few times and waiting about twice as long as the recipes said (about an hour, in the end, I think) it was done.


I pulled the foil wrapped cake out of the dutch oven (a 4qt oven, for those wondering) and peeled the foil from the sides of the cake. Then I put a cutting board on the top of the cake and carefully flipped it over. I removed the foil and was left with a beautiful pineapple upside down cake.


I cut each pineapple ring in fourths and most everyone got a piece. All said it was yummy, and no one commented on it being gluten free and/or yucky. So I'll be willing to use a Pillsbury gluten free cake mix again should the occasion warrant it.


And only tiny crumbs were left :)


---------------------------------------------------

We've taken Sunshine camping before, but this was both boys' first time camping. The last couple years we've come to the campout, but not actually stayed the night. Camping just wasn't an appealing prospect when I was pregnant with either boy, and we weren't feeling that adventurous when River was 8 months old. Ocean is 10 and a half months old and we were feeling more adventurous, so we decided to try it out. Overall, it was a good experience, though it's been a few years since I last slept on the ground, and my bones are definitely not getting any younger.

Sleeping in the tent was an adventure for the boys- they wiggle and flop around too much and there were just too many distractions. They didn't fall asleep until 11. Ok, we didn't head to the tent until 9:30/10, but still, they had a hard time winding down. They finally passed out, sprawled all over, not in their sleeping bags.


Ocean in particular was a wiggly little boy and ended up under the eye glass pocket. It didn't seem to bother him that it was in his face. Ahh, to be that oblivious...

Wednesday, July 1, 2015

Quick and Easy Homemade Cherry Ice Cream

a crappy picture of some yummy ice cream

We won a Soda Stream for best costumes at the Halloween 5k last fall, and lately Mr M has been experimenting with making his own syrups to use as soda flavorings. His latest try involved boiling and simmering some cherries, then squeezing the juice out of the cherries and using that in a syrup for cherry soda. The meat of the cherries was left over and we didn't want to just throw it away, so Mr M put it in a container to use for something else.

A day or two later, he hit on the perfect use for those cherries. He made ice cream for his birthday and put the cherries in it. 20 minutes in our Cuisinart ice cream maker, and we had some really yummy cherry ice cream. I don't usually like cherry ice cream, but that's because maraschino cherries are frequently used, and they are so gross. Real sweet cherries make delicious ice cream!

We really like this recipe because it only has a few ingredients and comes together so quickly. We've made custard-based ice creams before, but they take time- you have to cook the base properly, then wait for it to cool before it can go in the ice cream maker. Removing eggs from the equation simplifies things immensely.

Quick and Easy Homemade Cherry Ice Cream

2 cups Half and Half
2 cups Heavy Cream
1 cup Sugar
1 cup Cherries, pitted and roughly chopped

Mix the half and half, cream, and sugar until the sugar dissolves. Carefully pour the mixture into the frozen ice cream maker bowl. Be careful not to fill the bowl too full. When the ice cream reaches soft serve consistency, add in the cherries. Once the cherries are fully incorporated, scrape the ice cream into a container and place in freezer until ready to eat.

Tuesday, June 30, 2015

Gluten Free Strawberries and Cream Swiss Roll

crappy pictures of our yummy dessert

Mr M and I recently celebrated our birthdays (they're only a couple days apart) and we made some yummy desserts to celebrate. It's been a long time since I shared a recipe or talked about specific things we make, but I've got two to share- one today, one tomorrow.

One advantage to having a June birthday is the abundance of strawberries. As a teenager I picked strawberries every summer for a local farmer and we could eat as many as we liked (though we usually didn't, since we got paid by the quart and the more you ate the less you were paid). Despite that, I still love strawberries.

For my cake, I made this super yummy strawberries and cream swiss roll.  Naturally, it had to be gluten free, so I subbed a gluten free flour blend (Authentic Foods Multi-Blend Flour). The advantage of using this blend is that I was able to do a straight substitution, though I did decrease the amount of flour the original recipe called for, as directed by the flour package (3/4 cup flour blend for 1 cup wheat flour).

I wasn't sure how the gf flour would react to being rolled up, but I followed the directions for rolling up the cake right out of the oven, and didn't have any problems unrolling, spreading the filling, and re-rolling the cake. No cracking or falling apart, so yay me!

The recipe called for 6 oz cream cheese, but I used the the whole 8 oz in the package, because what would we do with the leftover 2 oz of cream cheese? We don't eat many bagels in our house. The extra cream cheese made the cream portion thicker and harder to spread, but it tasted good :) I used the cool whip the recipe called for, but next time I'll try it with real whipped cream since we don't usually eat fake food like cool whip. I used it this time because I didn't want to mess with the original recipe too much the first time through.

I was half expecting the taste of that chemical-filled white cream in the Little Debbie strawberry shortcake rolls (I used to love those back when I was still eating gluten), but the cream cheese gave it a thicker, richer, much more satisfying taste. While there were chemicals from the cool whip, using real whipped cream would eliminate them.

We didn't have any strawberry jam, so I just sliced up some strawberries, sprinkled them with a bit of maple sugar (so yummy!), and mashed them a little with a potato masher. I then spread the lightly mashed strawberries on the cake, though I think using sliced, non-mashed strawberries would work well also.

This isn't a super-quick dessert: you need time for the cake to cool completely before you fill it, then it needs to sit in the fridge for at least an hour before you eat it. It takes a bit of time, but it wasn't hard to make. The hardest part was flipping the cake over onto the clean towel: I had visions of it falling to pieces in the process, but it didn't.

Everyone thought it was super yummy (Sunshine was almost licking her plate) and we will be making it again. Sunshine has declared this her "favorite cake ever!" My pictures are pretty crummy, but there's a very yummy-looking photo included with the original recipe, which totally pulled me in in the first place.

Monday, June 22, 2015

Weekly Workout

Last week I still didn't hit the treadmill, but I worked on projects and I got a good amount of walking in on Wednesday. We  walked around DC with my sister and nephew (they were out for a National History Day contest that he was participating in). It was hot and humid all week last week, but thankfully Wednesday was slightly cooler and it even rained on us twice while we were walking around. This wasn't a bad thing since it helped us cool off a little :)

I forgot to wear my fitbit, so I don't know how far we walked, but it was at least 3-4 miles. Those miles were a mix of flat areas, hills, pushing Phil, not pushing Phil, etc.

Pushing Phil was actually easier except when we were going uphill. Phil gave me something to lean on and helped me walk a bit more normally. I've definitely had the pregnancy waddle going on the last couple weeks when I do much walking, and the stroller helped me walk better.

My nephew had a busy schedule with his National History Day stuff, but we managed to hit up the Air and Space Museum and the National History Museum while we hung out with him and my sister.

We went to our old standby Chipotle for lunch, but tried the ShopHouse for dinner. It's a small chain owned by Chipotle, with only a few restaurants, mostly in the LA and DC areas. Their food is all gluten free and influenced by Thai and Vietnamese flavors, focused on rice or rice noodle bowls that you build. Rice or noodles topped with protein and veg, then topped with a sauce and a garnish. You pick and choose your combination of the five items.

I thought it was pretty good, but a bit spicy, even though I tried to pick less-spicy items. River and Sunshine also thought the food was a bit spicy. Mr M didn't have a problem with the spiciness and I don't think my sister and nephew had a problem with it either. The price is similar to Chipotle's burrito/burrito bowl, so not super expensive. It's nice to be able to eat somewhere new without having to worry about gluten contamination and we will probably eat there again if we're in the same area.

For some reason none of us took any pictures until we were waiting for the metro. So we have a picture with crappy lighting of Sunshine, River, and my nephew. We were surprised that we got a smile out of River since it was almost 9 pm and he'd been up since 6:30 am and had only had a single 5 minute nap all day. The second we put him in his car seat he finally gave in and went to sleep.

Thursday, May 14, 2015

Sunshine's LEGO Birthday Party

Last year we decided to start doing friend birthday parties every other year, instead of yearly. Since we were in Massachusetts for Sunshine's birthday last year, it was easy to skip the party, but that meant that this year was a party year. Two years ago for Sunshine's last party we held it at the play studio we used to attend, and it was totally worth the money to not have to hassle with all the details. I was pregnant with River then and didn't feel up to doing it all.

Unfortunately, the play studio closed last year, so that wasn't an option this time around, and our budget really couldn't handle the costs involved with holding a party somewhere else. So even though  I'm pregnant again, I decided to plan and carry out the party myself.

A few months ago I brainstormed ideas and came up with LEGO as a theme. It's easy to decorate around and plan activities for, and there's lots of inspiration photos out there so I wouldn't have to come up with original ideas myself. I figured I could do it without too much work on my part, so I checked with Sunshine and then moved forward.

I didn't do a ton of advance planning, but there were some things I ordered online in preparation. I ordered a silicone mold set to make LEGO candies, some YumEarth fruit snacks, a few bags of random LEGO pieces, and some LEGO mini figures.

The party ended up being the same week that Mr M had time off from work, so I was trying to finish up the party planning at the same time we were working on our other projects. I should have changed the date of the party or not procrastinated quite so much- it would have made life a little less hectic.

Most of what I did was pretty simple, but some of it did take a bit of time. I didn't commit to a LEGO Friends theme, though I did include some Friends mini figures; but rather just focused on the bright primary colors of the original LEGOs.

LEGO head water bottles--- I just printed smiles on yellow card stock, cut the card stock with my paper cutter, and taped the strips to the water bottles. Super easy and pretty quick.

LEGO block treat bags--- I cut circles from red card stock and used double-sided photo splits to stick them to the bags (I just eyeballed the circle placement). Easy, but the cutting was a little time consuming. I also cut strips of paper to write the kids' names on since we would be using the bags throughout the party.

LEGO block decorations--- I cut bigger circles from card stock and used the photo splits to stick them to sheets of card stock, again I just eyeballed the circle placement. I taped the pieces of card stock to some string and strung it across the window. Easy, but time consuming.
crappy picture, but you can see the shadows of the circles

I also used some balloons and streamers for decorations.

I bought a gluten free cake from Whole Foods. It wasn't super cheap, but it was fancy and Sunshine loved all the sprinkles on it, and I didn't have to make it, so it was worth the money.

Sunshine and I melted chocolate chips and put them in the molds I bought. We did some white chocolate and some semi-sweet chocolate, and filled both molds. One was LEGO mini figures, one was LEGO blocks. The original idea was to put the chocolates on cupcakes, but since we ended up with the fancy cake I just handed out the chocolates that I'd wrapped in plastic wrap. This was an easy project, but did take advance planning for purchasing the molds and allowing the chocolate to set up. I had also planned on doing some homemade gummies in the molds, but ran out of time, so that didn't happen.

I forgot to take good pictures of the chocolates, so we just have these two- chocolates already wrapped up, and a mini figure with part of his head nibbled off.

The piñata also almost didn't happen. I'd originally planned on using a shoebox to make a LEGO block, but didn't have time, so I had just about decided to just skip the whole piñata thing. Then I remembered seeing paper bag piñatas on a blog, and decided to give that a try. I had a smaller paper bag with handles (not a full-size grocery bag) that I filled with the treats, taped shut, and glued crepe paper to. The finishing touch was to cut out some card stock circles and glue them to the crepe paper. I thought the handles would tear out pretty quick, but that wasn't the case at all. All the girls got plenty of turns to whack on the piñata, and even then it didn't break until I tore a couple holes in the bag. It was a lot sturdier than I thought it would be. I put bouncy balls, the LEGO mini figures I'd ordered on eBay (individually wrapped in plastic to keep the pieces together), YumEarth lollipops, and YumEarth fruit snacks in the piñata. I didn't want junk or tons of sugar, so I thought this was a good compromise.
I think I spent 15 minutes putting together the piñata the morning of the party

Sunshine helped River take the first couple whacks, but he wasn't really interested in the whole thing

love the look of concentration. we ended up removing the pool noodle from the pvc pipe for increased hitting force.

I put the random LEGO pieces I bought on eBay in a tray and then had the kids make "creations". The randomness made it a bit difficult, but I thought they did a good job, and it was an activity that kept them occupied for awhile. When they were done with them, we put them in the LEGO block bags, which were also used for their piñata loot.


I had planned a game using straws to move LEGO blocks and a craft making bracelets out of LEGO blocks, but we didn't have time to do them because everyone was more interested in playing with the sand and water table that I'd set up for the little boys. I wasn't about to complain though, because the kids were having fun and that was the important part. Sometimes you just gotta go with the flow. And I'd rather have too many activities available and not have time for them, than to run out of activities and have the kids be bored. And honestly, it was way less stressful for me to just sit and watch them play in the sand than to try to referee a game and a craft :)

While we were eating cake several of the kids said it was the best party they'd been to, so they had fun :)