Sunday, December 29, 2013

Sunday Funny

LMS (far left) at the Irish Music School Winter Recital

driving home from Irish dance class a few weeks ago

Me:  "You need to make sure you're practicing at home."

LMS: "But I can't remember the steps when we get home."

Me: "That's why I recorded you this week and last- so we can watch it at home and you can practice.
That's why I was never very good when I took dance classes- I couldn't remember the steps when I got home to practice either."

LMS: "Was that because phones hadn't been invented yet?"

Me: "Umm, no. I had a cell phone {when I took a dance class in college, anyway}- it just didn't record."

LMS: "Aawww man, you mean you could only call people?"

~~~~~~~~~~~~~~~~~~

How far we've come…..

Friday, December 27, 2013

Our New Trex Staircase and Porch


The deck that leads off the kitchen and down to where we park the cars has been having problems lately. The wood had started to crack and split and part of one of the stair treads had even come off. The wood was only nailed down (why didn't they use screws?), and some of the nails were loosening and popping up.


It was rapidly becoming a major safety hazard. We thought about replacing the old wood decking with new wood decking, but given how this wood has fallen apart (it's probably original to the house, so about 14 years old), how high-maintenance it is (constant power washing for mildew, plus regular re-staining), and the fact that we want it to look nice for when we sell the house (no idea when that will be, but we know this isn't our forever house), we decided against that. Even though it's more expensive, we decided to switch to Trex decking, as well as Trex posts and railings.

Mr M started the project a week or two before his mom arrived, hoping to be here when The Little Mister was born. We thought it'd be a quick and fairly easy job and he'd be done before she arrived.

Yeah, right.

We had to order all the Trex railing components, but only found out two weeks later that the order hadn't been placed because they needed more info but hadn't bothered to call us. We finally got that snafu straightened out after another week of phone tag, trying to get a hold of the right person.

In the meantime, Mr M tore out the old wood decking and railings and discovered that it hadn't been built to code and the stair stringers also needed to be replaced.

looking through the screen door as Mr M demos the stairs and deck

demo in progress

After tearing out everything that needed to be replaced (just the posts were left), Mr M started rebuilding it, placing the beams closer together so they'd be within code and adding a fourth stair stringer for better stability.

LMS and Mr M's mom helping him build the deck frame

He also ended up cutting the posts off flush with the deck. We thought the post sleeves would just slip over them, but the largest post sleeves fit 4" square posts and our posts were 4"x 5.5". Cutting them off enabled Mr M to use metal brackets to attach the posts to the deck.

frame built and stringers in place, getting ready to start attaching the Trex planks

I didn't take a picture of the decking installed without the posts up, but we ended up using it like that for awhile.

In between starting the project and finishing it, Daylight Savings ended, Mr M had drill out of state, Mr M had to work extra hours to make up for those missed while at drill, it rained on the few days Mr M actually had time to work on it, and we had to wait for another order to come in because when they ordered the railing pieces they neglected to get the bottom pieces.

Without the bottom railing pieces, you can't install the balusters or the top railings. It was pretty much a comedy of errors that you just have to go with the flow and do the best with what you've got.

posts installed, waiting for railing pieces


Mr M eventually bought a work light on a stand, which worked better than using the truck headlights, so he could work in the dark. Not the preferable way to go, but at least he was able to get the posts installed. And eventually the missing railings were delivered and he was able to install those as well.

installing the railings 
LMS was concerned about people falling off the other side and put up rubber band "railings" :)

Christmas Eve he was finally able to pronounce the project finished! 

Three months after starting what was supposed to be a quick and easy project. At least now we know what to look for in the future when ordering materials, and we know to plan on it taking longer than we think it will, especially with Mr M's work schedule.

isn't it pretty?


We love how it turned out! It's no longer a death trap, waiting to bring us a lawsuit, and it looks soooo much nicer.

There's definitely a learning curve to a project like this- especially the railings that go down the stairs. Practicing on this little deck and short staircase was good practice for the larger decks and long staircase of the front and back decks. We'll eventually re-do them also, but will have to save up since Trex is not cheap, unfortunately.

Have you replaced a deck? Was it easier or harder than you thought it'd be?

edited to add:
Mr M thinks I should have included a side-by-side comparison of the before and after, and he's right. So, Babe, this one's for you! :)
I can't believe it took us so long to update- it's so much nicer now!

Sunday, December 22, 2013

Sunday Funny

aren't they so cute together?

We've noticed that LMS and TLM have/had different cries.

When upset, LMS would say "ninga-ninga-ninga!"
When TLM is upset, he says "ning!" very emphatically.

It's funny because it's the same sound, just a different variation.

Do other kids say "ning", or is that just our kids?

Friday, December 20, 2013

My New Favorite Baby Carrier

Disneyland, 7.5 months old, December 2006
Our first baby carrier with LMS was a Baby Bjorn front carrier, which we liked, but once LMS got to a certain weight (15 pounds, I think?) it made my back hurt to carry her in it.

Seattle Space Needle, almost 2 years old, April 2008
At that point I started researching other baby carrier options and found the Ergo carrier. I really liked this one and wished I'd found it when LMS was a baby so I didn't need to find a new one several months later. The Ergo worked great with LMS. We used it front facing when she was younger, and then switched her to my back. I carried her on my back a lot when she was young (till about 2 and a half, I think?) and then off and on for another year or two when the need arose. I never did the baby carrier seat thing (we had her in a massive convertible car seat from the time she was born)- so anytime I took her with me, she was in the Ergo. I loved being able to keep her contained (no running off!), though as she got older I had to make sure I didn't stand too close to shelves in stores or she'd grab stuff off them.
image via here
While I was pregnant with TLM I decided I wanted to give the Moby wrap a try, so I found one on craigslist. I know lots of people love the Moby, but I've used it a few times now and I don't love it. I have a hard time keeping the fabric flat while putting it on, and TLM doesn't stay in place very well. All that fabric makes me really warm, even in winter. Since I don't love it, I'll most likely be selling it again on craigslist.

Mr M wearing TLM with the hood up at the Turkey Trot last month
When I was pregnant I also discovered the Boba carrier while at a local baby expo. It's very similar to the Ergo, but with a couple differences that I thought made it worthwhile to purchase it. The Boba can be adjusted to hold an infant- no special insert needed (which is the case with the Ergo). They both have pockets on the main portion, but the Boba also has pockets on the waist band. They both have hoods, though I've found the Boba hood easier to use than the Ergo hood. It's not a completely fair comparison yet, though, since I primarily used the hood when LMS was on my back in the Ergo and I have yet to be able to do that with TLM since he's still too small to be on my back.

There are three things I really like about the Boba that our 7-year-old Ergo doesn't have (maybe they do now, I don't know). The straps on both shoulders that you can snap around your purse strap to keep it on your shoulder are awesome. I could never keep my purse on my shoulder with the Ergo carrier on. The second thing I like is that the Boba has little foot stirrups that attach to the carrier to support the child's feet and legs once they start getting bigger. Mr M thinks it's asking to have the kiddo constantly kicking me, but he could do that without the stirrups, so that's not an issue to me. The third thing is that the neck support area at the top of the carrier body is adjustable, which is great for getting a snugger fit for smaller kiddos while still allowing for future use as the baby grows.

Both the Boba and the Ergo are adjustable- Mr M, who's over a foot taller than me can carry the kiddo in either carrier just by loosening the straps. Tighten them back up, and I'm back on kiddo-carrying duty.

I never got around to selling the Ergo on craigslist, even though I'd planned on it, and I don't think I will for awhile now. The Boba is constantly migrating between the car and the house, and there have been a couple instances now where the Boba wasn't in the car when I needed it. Ever tried holding a baby in your arms while pushing a shopping cart through the grocery store? I was so sore after that experience! So now the Ergo lives in the car for those times when the Boba gets left in the house.

So in my mind, the Boba has a slim lead over the Ergo, and they're both ahead of the Baby Bjorn, which is ahead of the Moby wrap. What carrier(s) have you used? Which is your favorite?

Thursday, December 19, 2013

Pectus Excavatum

It's taken me awhile to write this post. We were pretty worried when we first found out about it, and it took some time to come to terms with it.

At his first checkup after leaving the hospital, the nurse practitioner casually mentioned that The Little Mister had pectus, but we didn't need to worry about it right now.

Naturally, we wanted to learn more about it, so we did some research.

Pectus excavatum is a congenital defect of the sternum that results in a concave appearance. There's not much to do till he hits puberty and we see how his sternum grows. At that time, if needed, surgery can be done to correct the concavity (rods inserted in his chest and left for about three years seems to be the most common treatment).  We have a friend whose son also has pectus, and he's done just fine without surgery- he's even an Army Ranger! So we may not need to do anything at all.

In the meantime we just keep an eye on him and make sure he doesn't have problems breathing. That's not a common occurrence, but it is a possibility.


You can see the concavity in these pics, though the appearance had already started improving by the time I took these. As he's grown and put on weight, his chest appears more and more normal, though if you palpate his sternum you can still feel the concavity. When he was first born, it was pretty obvious when he breathed in. It's not nearly as obvious now, unless he's gasping in while crying; then his whole chest seems to cave in with each breath. A bit worrisome, but as soon as he calms down his chest movements go back to normal.


"Congenital defect" is a term that can definitely bring on the maternal guilt. Was there something I could have done differently to avoid this? Why him? Is he going to struggle through life? Will others make his life more difficult because of this?

It's not like it's the first time we've had to deal with health problems that are inherited. Celiac is genetic and The Little Miss got it from me. Somehow that's easier to deal with though. Maybe because it's not as physically evident?

After doing more research we also found out that about 1% of pectus is caused by celiac and it could also be caused by nutritional deficiencies commonly related to celiac (vitamins D & C).

That really brought on the maternal guilt, till I realized there's really nothing I could have done either way. I'd been gluten free for more than 3.5 years at time of his conception (4.5 years now) and have supplemented C & D (as well as others) for a number of years. I was doing my part to be as healthy as possible.

I will admit to being a bit discouraged though. I thought I had the celiac under control and there wouldn't be further bad side effects other than the leaky gut issues that I've been working on the last couple years. So it's a bit disconcerting to find that it apparently can cause problems even when under control. I guess the side effects are more lasting than I thought.

For now, we're not too concerned and have adopted a "watchful waiting" attitude for this situation. Prayers and priesthood blessings have helped us reach that point and not be constantly worrying when there's nothing we can do right now.

Wednesday, December 18, 2013

2 Months


It's only taken me two weeks to finish this post :)

The Little Mister is two months old already. How time flies!

The pictures above show his usual expression: solemnly watching everything around him, silently taking everything in with his big brown eyes.

For the most part he's good natured and calm and has the sweetest smiles, though I have a hard time catching them on camera.

He's growing so fast and is adorably chubby. We can tell when he's hitting another growth spurt- he'll eat all day, then sleep the whole next day.

Speaking of sleep, The Little Mister usually sleeps 4-5 hours straight at night. Little Miss Sunshine did this too, and yes, I realize how lucky we are :) Having them start sleeping for longer periods from a young age really makes life so much easier.

He loves snuggling, just like his big sister. He'd much rather fall asleep in my arms or laying on my chest (or Mr M's) than in his bassinet. We're working on transitioning him (and are finally making good progress), but it's hard to feel super-motivated about it right now, since it is enjoyable. Only the thought that it could become a big problem in the future (we HAVE to snuggle in order for him to fall asleep) is keeping us pushing forward to help him learn to fall asleep on his own.

He HATES dirty diapers. Diapers these days have little wetness indicators- which is so cool! They didn't have those when LMS was in diapers.  The other day TLM started fussing, so I checked his diaper and a tiny bit of the wetness indicator had changed color, and he wanted that diaper off right then! Too funny. We do try to respond pretty quickly- we don't want him to get used to the feeling and not mind having a wet/dirty diaper. We'll be starting early potty training after the holidays, and an awareness of being wet/dirty helps the process. We did early potting training with LMS and while we still diapered for longer than I wanted to, there were a couple major benefits. 1- she was never afraid of pooping on the toilet. 2- I was able to recognize when the "yucky poopy" problems started when she was about 2 1/2, since I was used to seeing what her poop looked like in the toilet (it's a bit harder when it's smooshed up in a diaper). So, worth doing, even if it's not as successful as we envisioned.

He likes his thumb more than I'd like. Thumb sucking is cute on tiny babies, but is not so cute when you see a 5-year-old doing it. I prefer pacifiers because you can take away a pacifier, but you can't take away a thumb. LMS only tried sucking her thumb once as a newborn. I pulled it out, popped in a pacifier, and she never looked back.  TLM, on the other hand, doesn't really care for his pacifier, and lately has upped his efforts to suck his thumb. I caught him once or twice as a newborn, but the last few days its been a lot more frequent. This wasn't completely unexpected- we thought we saw him sucking his thumb in the ultrasound. Unfortunately for him, I have every intention of being more persistent than him :)


He has funny hair. Even though she was pretty much bald when she was born, LMS had 8 super-long hairs on the top of her head. Yes, we counted them- they were the only hairs she had for a long time. TLM has more than 8- he has a whole tuft of longer hair, which he gets from his daddy. Mr M has a thicker tuft of hair at the front as well. We're having fun playing with TLM's hair, and enjoying the fact that the hair that fell out a month ago has started regrowing already. No more male-pattern baldness here!

Sunday, December 15, 2013

Sunday Funny


Mr M has been working on our kitchen steps for awhile now. Once he finally finishes, I'll post the whole saga. For now, I'll just say it involves multiple orders because the store didn't place the order properly in the first place, daylight savings time, and bad weather.

LMS felt that the steps needed a danger sign to warn people away from it, just like the sign she put on the door when there was no platform or steps installed. The problem was that Mr M was actively working on the railings when she got tired of "helping" him and decided to string up this sign :)

Friday, December 13, 2013

Bookshelf Shoe Bin

This is one of the final projects I tried to finish before TLM was born. It was already mostly done, but I still needed to add the doors.
we used it like this for quite awhile

This shelf came about as a solution for a couple problems we had.

Problem one:
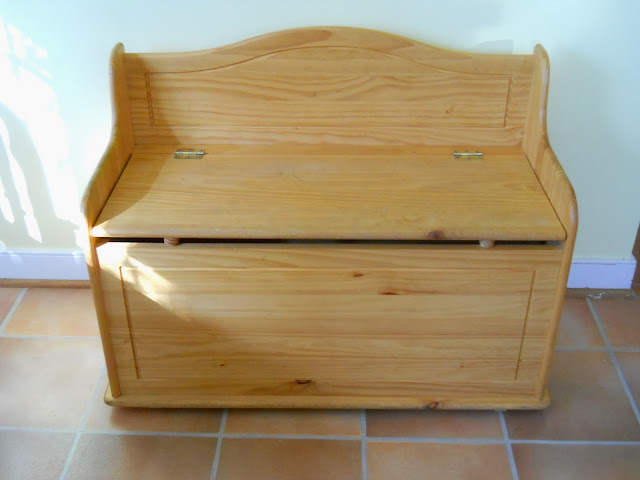
We had this bench for a number of years and used it to store our shoes. However, it was too wide and took up too much space in our small dining area.

Problem two:
When we started homeschooling, I intended to have our school room in the basement. Unfortunately, the lighting isn’t great- the windows face north and west, so sunshine doesn’t come in till late afternoon. Not ideal. Instead, we found ourselves doing schoolwork at the dining table, next to the giant window with lots of natural light (I need my sunshine!). So we needed a space near our school area to keep our books and school supplies close at hand. We kept them in the library for awhile, but it was annoying to have to get up and walk into the next room to retrieve something we needed. Guess I’m just lazy in that respect :)

The solution to the two problems:
The original purpose of this shelf unit was part shoe bin, part homeschool supply shelf (as you can see in the first photo). The lower two shelves would house the shoe bin portion, with each opening having a pull-down door. The top two shelves would remain open for access to books and  things.

I built it a year and a half or so ago, when I did a building blitz and built and painted several projects all at once. I didn't install the doors immediately because I was waffling between installing drawers or drop-down doors. So we moved it upstairs and started using it while I made up my mind.

Before I got around to building the doors though, I decided that I was tired of doing school at the kitchen table. It worked ok while Mr M was out of town for extended periods of time, but now that he's home a lot more, it just wasn't working. There was always papers, books, crayons, and computer stuff scattered all over the table. We could no longer just push things off to the side and still have room to eat meals. Plus the constant clutter was annoying.

So I came up with the homeschool cupboard. Not only would it keep all the school paraphernalia off the kitchen table, it would provide storage space for all the books and other school materials. This freed up the top two shelves of the shelf in the kitchen for other uses. The top shelf would be for baskets of mittens, keys, and the other detritus that always needs to be close to the door. The second shelf would become another space for shoes. We do wear shoes in the house - Mr M and I both wear orthotics and it's better for our feet to wear shoes than to go barefoot - but we keep most of our shoes by the kitchen door.

Once I made up my mind to change things up, I held off adding the doors until I was ready to build the homeschool cupboard doors. Then I built all of them at once. In the meantime, the shelf sat in the kitchen, looking like this, until I could finish the homeschool cupboard.

Once I moved all books and school stuff out of the upper shelves, I was left with 6 spaces for shoes, and they needed doors. When I came up with the idea for the shelf in the first place I envisioned pull-down doors similar to the one I used in the blanket cubby in the basement, though able to open more.

I built the doors for the shoe bin the same as the homeschool cupboard doors1/4" plywood glued into channels cut into 1"x3" boards and held together with pocket holes made with my Kreg jig.


After measuring where I was going to put the magnetic catches, I screwed the metal plates to the back of each door.


Then I drilled holes and attached the door pulls. I found them at Target and I love them! Aren't they so cute? The label space is super handy for helping us remember whose shoes go where.

I attached two hinges to the bottom of each door, then screwed them into the shelf. Then I attached the magnetic catch to the roof of each cubby area and checked to make sure the alignment was correct (door not too far in or too far out).

The last step was to measure how much chain I needed to allow the doors to lay flat when open (they'd flop all the way down without the chain to stop them) and cut 12 pieces using the metal cutting attachment on the Dremel. Then I attached one end of each piece of chain to the side of a cubby and the other end to the door.


Eventually I'll paint the doors white to match the rest of the cupboard (don't need to think about that one like I do the other projects I've built), but my project time is pretty limited right now since TLM is convinced he needs to sleep on me, rather than in his bassinet. Enjoyable, but not productive :)
bins for Dad, Mom, LMS, TLM, Hiking Boots, and Water Sandals

I liked the functionality before, but I love how much cleaner and organized it looks now that stuff isn't hanging out all over.

And to keep the top from collecting clutter, I put some Christmas decorations up.  My goal is to change this seasonally. That is not a strong point for me, so we'll see how it goes :)

Thursday, December 12, 2013

Christmas Tree Crate


I've seen a couple crates for Christmas trees lately, and I decided to make my own version. I didn't have any weathered wood sitting around, but I found some fencing pieces at Lowes that had been stored outside and were nicely rustic-looking.

What I used:
  • 3 boards, 5.5"x6' 
  • some pieces of 2"x2" that I had sitting around
  • an old printer table top
it was raining, so I was working on the front porch, which is covered, but everything still got wet
we've had ice storms since then, so I'm glad I didn't wait- we'd never have gotten the tree up!

The table top is from a mission-style printer table we used to have. It didn't survive one of our moves, but I was able to salvage the top. It's been sitting in my wood stash for awhile now, waiting for just the right project. When I looked through my stash, I found that it was just the right size for this project- just a smidge larger than the ugly green plastic tree stand I wanted to cover up. I believe some of the crates I've seen don't have bottoms, but I wanted to get the plastic off the floor in hopes of avoiding water damage to our wood floors.

Because the boards are so wide, I only needed to build it two boards high to cover the ugly green tree stand. After measuring and cutting my boards to fit around the table top, I built two boxes.

I placed one box around the table top and screwed the box to the table top, then screwed a 2x2 in each corner, coming from underneath.

Once the 2x2s were in place, I slid the second box over the 2x2s.

Then I used a couple screws in each corner to hold the boxes in place.

And all done!


I brought it inside and we put the tree in the stand and left the tree for a day so the branches could relax after being released from the netting.

The lower branches are close to the crate and make it a bit difficult to water the tree, but we didn't want to trim them since it's not a very tall tree.

LMS picked out the tree and it's on the short side because she wanted one "her size"  :)
Since it was her size, we let her do most of the decorating, and she had a blast.

This project cost about $5 (for the 3 fence pieces), didn't take very long to put together, and turned out great. My kind of project!