Sunday, June 26, 2016

Sunday Funny


River doesn't usually have bed head problems, but one morning he woke up with a spectacular case of bed head. I don't know what he was dreaming about that night, but he must have been doing a lot of tossing and turning, and maybe even pulling on his hair.

I'm not sure why he put his arms up for the pic

Tuesday, June 21, 2016

RVs and Ice Cream


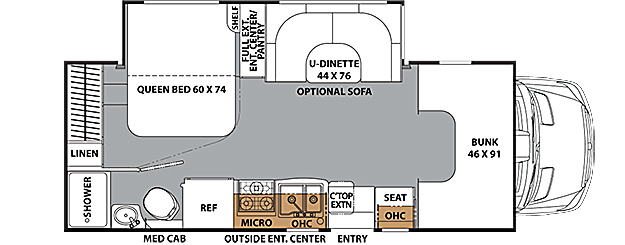
2007 Itasca Winnebago Navion 23J, image source 

After two long road trips (4 days and 6 days- 1, 2) in the last 6 months, we've decided an RV is closer to being in our future than we had thought. We had planned on waiting a couple more years, but the road trips showed us that we really need the advantages that come from having an RV when we take our next big road trip next summer (we were supposed to do one this past summer, but I was too close to giving birth to Ocean for that to happen). We drove the Camry both times because it gets better mileage, but the CRV wouldn't have offered much more space.

Some of the things we're looking forward to: more space for the kiddos (River is already figuring out how to push Sunshine's buttons), on-the-go bathroom breaks (important with little kiddos), better food options (not relying on junk food or the closest 5 Guys or Chipotle), and not being dependent on static hotel reservations. Sometimes we make good time, but have to stop because we reached our hotel, even though we could still drive some, or it was slow going and we really just need to pull over, but we haven't reached our hotel yet. Being able to pull over into a convenient truck stop, rest stop, or wally world really makes traveling so much nicer. 

We first thought that the Winnebago Era 70X on a Sprinter chassis would be a good option. Diesel engine with power, short enough (only 24 feet long) to be maneuverable in traffic, 5 seat belts in the back, frig, sink, and stove in kitchen area, and -most important- a small bathroom for kiddos to use when the need strikes. They're not the easiest to find, but I found one with the floor plan we liked while we were driving back home on our most recent road trip (seriously, that road trip showed us just how much we need a different road tripping vehicle), so we stopped to look at it at some random RV dealership. I liked it, but Mr M felt it was a bit cramped side to side.  The 70X doesn't have a slide, so there's no extra space, like our little trailer had. 

that back bench has 3 seatbelts and converts to a large bed

doesn't River look like he's inspecting the upholstery?

The dealership also showed us a couple small Winnebago Class Cs, which gave us a good place to start looking at other options. When we got home I did some more research and found several small Winnebagos I thought might work. We found one or two of them at a dealership an hour or so away, so we took a little trip up there to check them out.

The 2016 View J was nice (and has a slide), but only had three seat belts in the back. Since we plan on adopting still (someday I'll do a post on that) we need four seat belts for kiddos. We liked the dedicated bed in the back and the bed over the cab: lots of sleeping space for everyone. If we went with  the Era 70X, the kiddos would be sleeping on the floor and rigged-up beds across the front seats, which would work, but not be optimal.


Since we were there, we checked out some much bigger RVs that were of course roomy and impressive. But we don't want anything too big (mileage decreases the bigger you get, and we already did the low mileage thing with the truck and trailer), so we're concentrating on the smaller models.  The challenge is finding a smaller RV with four seat belts in the back- most only have three.

I have found several models that are 23-24' long, have a slide, cab over bed, freezer over frig, and 4 seat belts in the back, but most of them were only produced in certain years. 2007 for this one, 2008 for that one, 2011 for this other one. It makes it a bit more tedious when searching for listings, but at least there's options. If money weren't a factor and we could buy a brand new one, I'd pick this one, the Coachmen Prism 2200 LE:

It has 3 seat belts at the dinette and 1 by the door and a really cool entertainment center/divider between the bed and the dinette.

We're not planning on purchasing one until late next spring/early summer, before road trip season starts, so we have time to look for the right RV for us, which will probably be the 2007 Itasca Navion/Winnebago View 23J (different names for the same vehicle).

---------------------------------------------------

On our way home from looking at RV's we stopped for ice cream. It was cold and rainy, but every time we pass this place we say we should stop there, but we never do. Are we the only ones who do this?


So this time we decided to stop and try out the ice cream. It was pretty good, and River made friends with the local cow:

when he gets older he's not going to appreciate this picture nearly as much as we do :)

Monday, June 20, 2016

Chicken Coop Progress, Week 7

what the coop looked like at the end of week 6

Last week was a bit of an anomaly for us: Sunshine had nature day camp, which meant an hour and a half in the car in the morning and again in the afternoon. All that driving threw off nap times for the boys and made it hard for me to get anything accomplished before it was time to go pick Sunshine up.

One morning we had a couple hours to kill in town before my chiropractic appointment, so the boys and I went on a walk on the trail Sunshine and I have been on a few times. It's a nice 4.23 mile round trip and pushing both boys in the stroller up a small mountain for two miles is a great workout. I wanted to run parts of it, but my shins just aren't up for it yet.

River reached down and Ocean's hand for a few minutes
both boys thought it was funny and were giggling the whole time

Last week I also squeezed in two treadmill workouts + 1.25 coop work days. The .25 work day was picking up 7 sheets of 4'x8' plywood siding from Lowes. While I helped load the cart in the store, some nice young men loaded the trailer for me and when we got home I left the plywood in the trailer with a tarp over it, so I didn't actually do much that day :) I made up for it on my full work day, though.

River helping- he loves those little baskets on wheels

I cut and installed the two missing rafters and added some bracing to the end caps of the walls. I also added screws to the plywood braces along the ridge line (I was skimpy with the screws last week since I was running out of them). I also started installing these metal rafter ties I found at Lowe's. I wasn't super happy with just toenailing the rafters to the frame and the rafter ties make everything much more secure. Once all the siding is up I'll finish attaching the rafter ties.


I purchased 7 sheets of plywood and was able to get 5 of them cut and installed. Since I left the plywood in the trailer, I parked as close to the coop as possible and shifted each sheet one at a time. The plywood is heavy and awkward, so I didn't want to have to move it more than I needed to. Manhandling each sheet in place and holding them there while I screwed them in place was a workout.

you can see the additional roof bracing on the end and some of the plywood

I did the largest solid portions of the walls first, then progressed to the areas that required more cuts in the plywood. Because I am using plywood with vertical lines I have to be careful about how I piece the walls together. And it means there's a bit more waste, unfortunately. I'll find some other projects to use the scraps on though. It also means I miscalculated how many sheets of plywood I need, so I'll be making another trip to Lowe's. Which I needed to do anyway to get the roofing materials, so at least it's not that big a deal.


In the end I didn't get as much accomplished as I'd hoped, but I knew I wouldn't have as much work time because of all the driving to and from day camp, so it didn't really come as a surprise. I do feel like I'm making good progress though and am looking forward to finally finishing the coop.

I didn't put windows in the north wall so we can hang rabbit cages, place the roosts, or install laying boxes when we get layers. The blank wall gives us more flexibility to change things up as our needs change/evolve.

I ordered 30 chicks which should be arriving tomorrow or Wednesday, so I've got my final deadline. We have a couple weeks before they're big enough to move into the coop, but the countdown has begun.

Sunday, June 19, 2016

Sunday Funny


This has only taken me 6 months to post....

The picture above is Sunshine and Ocean this past December. I took it when I realized that he was wearing the same shirt River was in the picture below:


River was a few months younger than Ocean in these pictures, but even so it's very obvious that they take after different sides of the family :) And yes, Sunshine is wearing the same glasses- she likes those pink frames and I think we're on the 3rd pair of them now.

Friday, June 17, 2016

Our Weekly Hikes


The kiddos and I have been enjoying our (almost) weekly hikes and a recent hike yielded a lot of interesting sights. Like this brightly colored centipede.


A bit later we explored a fallen tree and its roots. It diverted a stream and we followed the water's path as it went around the tree and under the trail.


 And we found raccoon prints in the mud bank next to the tree and the stream. And maybe some deer prints too?


A bit later we found this interesting hole in the tree. Unfortunately it smelled pretty bad. Though I suppose that could be fortunate since River had no desire to stick his hand in a super stinky hole, which is a good thing in my eyes.


 The older kidlets and me.


 And the youngest kidlet, conked out.

I even caught Sunshine and River sharing a walking stick for 3.7 seconds. Too sweet!

We don't always make it to the park for hikes, but we enjoy our time when we do. I'm kicking myself for taking so long to do this, but I'm glad we finally are. I'd like to start going to parks that are further away so we can explore them too, though that we might not for another year or two, when we're not so tied down by the boys' nap schedules.

Thursday, June 16, 2016

A Proud Homeschool Moment


When some friends came over recently, they ran over a toad on their way up the driveway. While the kiddos were outside playing they found the fresh roadkill and decided to do a bit of dissection.

They came in and found the tools leftover from Ocean's stitches (the ER we went to was going to toss them if we didn't take them), some gloves, and a small frog dissection model I bought a few years ago.


They carefully examined and identified the parts of the frog. The only thing they were missing was a scalpel to open up the frog more neatly. Despite the lack of a scalpel they did a great job and learned a lot. And they didn't have to smell formaldehyde while doing it- does anyone else remember that funky smell that lingered around dissection critters in science class?


My friend and I had to grab our phones and take pictures- it was such a great moment for us :)  It's always nice to see your children being motivated on their own to learn and explore, regardless of whether they're homeschooled or not.

Wednesday, June 15, 2016

Gluten Free Dutch Oven Pineapple Upside Down Cake


Last Friday night we had our annual Cub Scout family campout. We had a great turn out and everyone had lots of fun. Each family was responsible for their own meals, which means lots of foil dinners and hot dogs. We went the foil dinner route (and they were quite good, if I do say so myself. I added a couple pieces of bacon so there would be enough fat to keep everything from burning and it gave a great flavor to the meat and veggies), and of course there was s'mores for dessert.

But Friday morning I got to thinking about it and decided I wanted to do a dutch oven pineapple upside down cake. Never mind that I haven't done any dutch oven cooking in years.... Since it was a last minute thing we stopped by wally world on the way to the campground to pick up a boxed cake mix and a can of pineapple rings. I brought eggs, brown sugar, and butter from home to round out the ingredients.

Wally world used to carry Betty Crocker gluten free cake mixes, which I've used a few times with decent results. But this time they didn't have them- they only had Pillsbury gluten free cake mixes, which I've never used before. Without any other options, I decided to give it a try.

I read through multiple upside down cake recipes, and they're all pretty much the same. Butter and brown sugar in the bottom, pineapple rings on top, followed by cake mix that was already mixed up in a bowl, using the pineapple juice from the can.  I also read that lining your dutch oven with foil made clean up a lot easier. Since our dutch oven is in need of re-seasoning, I opted for a couple layers of foil.

Once the cake was layered into the dutch oven, I put the lid on and put it over some coals in the campfire. I pulled out a small chunk of smoldering wood and put it on the lid. Everything I read said using charcoal briquettes is the easiest route as it's easier to be precise. I would have to agree, since the top of my cake was done before the middle was. But after rotating the dutch oven a few times and waiting about twice as long as the recipes said (about an hour, in the end, I think) it was done.


I pulled the foil wrapped cake out of the dutch oven (a 4qt oven, for those wondering) and peeled the foil from the sides of the cake. Then I put a cutting board on the top of the cake and carefully flipped it over. I removed the foil and was left with a beautiful pineapple upside down cake.


I cut each pineapple ring in fourths and most everyone got a piece. All said it was yummy, and no one commented on it being gluten free and/or yucky. So I'll be willing to use a Pillsbury gluten free cake mix again should the occasion warrant it.


And only tiny crumbs were left :)


---------------------------------------------------

We've taken Sunshine camping before, but this was both boys' first time camping. The last couple years we've come to the campout, but not actually stayed the night. Camping just wasn't an appealing prospect when I was pregnant with either boy, and we weren't feeling that adventurous when River was 8 months old. Ocean is 10 and a half months old and we were feeling more adventurous, so we decided to try it out. Overall, it was a good experience, though it's been a few years since I last slept on the ground, and my bones are definitely not getting any younger.

Sleeping in the tent was an adventure for the boys- they wiggle and flop around too much and there were just too many distractions. They didn't fall asleep until 11. Ok, we didn't head to the tent until 9:30/10, but still, they had a hard time winding down. They finally passed out, sprawled all over, not in their sleeping bags.


Ocean in particular was a wiggly little boy and ended up under the eye glass pocket. It didn't seem to bother him that it was in his face. Ahh, to be that oblivious...

Tuesday, June 14, 2016

DIY Cub Scout Regatta Trophies


Every year we have a River Regatta for the Cub Scouts. It's combined with the other local LDS packs, just like our annual Pinewood Derby. We all have fairly small packs so it's nice to combine forces: the more, the merrier.

This year our pack was put in charge of awards and after some googling I decided to make little trophies similar to the ones I found here. They're similar to the trophies I've made for the Pinewood Derby the last couple years and are pretty easy to make. Even better, all the wood came from my scrap stash. All that needed to be purchased were the rubber duckies. We bought one package of these and one package of these, though if we're in charge of them again next year we're only buying the pirate duckies.

I made 21 trophies, 7 each of 1st, 2nd, and 3rd place. The Wolves, Bears, and Webelos each had two races of different lengths, and there was one final race that everyone, including siblings, participated in.
trophies waiting to be painted

The upright portions are 2"x2" and the bases are 1"x4" boards cut into squares (so they're about 3.5"x3.5"). They're glued together with a screw connecting them from the bottom.

The 2x2s are cut to 3" for the 3rd place, 3.5" for the 2nd place, and 4" for the 1st place. I then cut 1/4" off each corner, like the inspiration trophies. I debated doing this since it was a bit fiddly and looked a little weird on the unpainted wood. After spray painting, they looked fine, so I'm glad I went ahead with the extra fiddly-ness.


After the paint dried, I cut sailboat shapes and 1st, 2nd, and 3rd lettering from white vinyl. I cut little flags from red vinyl and little stars from yellow vinyl. Those were completely unnecessary, but my OCD demanded the extra little details :)


After I finished fiddling with the vinyl I used gorilla glue to attach the duckies to the wood. I used strips of painter's tape to hold the duckies in place while the glue dried.


I love how they turned out and everyone agreed. I had the wood, screws, glue, spray paint, and vinyl, so the only cost was the two dozen duckies. Since we have a tight Cub Scout budget, the cheaper we can do things, the better.

----------------------------------------------------------

You might be wondering why we do a river regatta rather than the standard rain gutter regatta. Well, a member of one of the other wards has a river running through his front yard and they've hosted the regatta for the past 10+ years. It's so much more fun than a rain gutter regatta :)

The river regatta consists of boats made from chunks of 2x4, with races started at two points in the river. The first time they're placed in the water upstream, the second time they're dropped from the pedestrian bridge into the water.


The great thing about this is that you can't design your boat to win- it's pure luck how your boat does. Which side of the river, which eddies it encountered, and rocks, branches, etc all affect how fast or slow each boat goes. Lots of fun for everyone!

Monday, June 13, 2016

Chicken Coop Progress, Week 6

what the coop has looked like for the last two weeks

I kind of feel like the coop project is stretching out for ever. But when you're building on a budget and with limited work time, you take it all in stride. I do feel like I'm finally making good progress and anticipate even more this week.

This week I had 4 coop work days, 1 treadmill walk, and 1 hike. Our hike was gorgeous- the park we go to has multiple loops you can combine to go different distances. This week since we were by ourselves we took a longer loop and the trail was completely under the trees. Nice and shady and cool. Which was nice since the new section of trail was also steeper and more of a workout.

love all the shade!

One day we made a trip to Lowe's for 2x4s for rafters. Another day I screwed the wall frames to each other and to the floor frame and removed the 2x4 blocks I'd been using to hold everything in place. I also added a 2x4 header to the tops of the walls to help tie everything together.

blocking removed, walls secured, and header on

I also tried to figure out what angles I needed to cut the 2x4s for the roof. I wasn't completely successful, so later that night I spent some time with pencil and paper to figure out the angle I needed. Some of those geometry equations really do have real life applications.


The next day I didn't have much time so I decided to use what time I did have to figure out how I was going to put the rafters together. I used a scrap piece of 2x4 to stand in for the ridge piece. I cut the center upright 2x4 to length and checked how it all balanced. I used scrap plywood to hold the top angles in place.


Because of all my prep work before, I was able to move a lot quicker the next day.


Getting the roof ridge pole in position took some balancing and fiddling, but once each end was secured, the rest went fairly quickly. There was still a lot of moving up and down the ladder and shifting it and such as I secured each rafter in place, so it wasn't fast, by any means, but it was pretty straightforward.


I used scrap plywood on all the rafter angles. It doesn't look as neat as I'd like, but it uses up some of my stash, so I'm ok with the mismatched look. When we went to Lowe's I forgot to factor in the roof ridge pole so I ended up being short one 2x4 and two rafters on the north side. Despite that, it's finally starting to look like something!